Installation: Difference between revisions
(Created page with "Installation Guide") |
No edit summary |
||
| (21 intermediate revisions by the same user not shown) | |||
| Line 1: | Line 1: | ||
Installation Guide | '''Installation Guide for Customer365: | ||
''' | |||
Download the file ''Customer365ForSageCRM_RC1.exe''. Run the installer on the server. The installer should add the website to IIS automatically. | |||
After installation is complete, proceed to Sage CRM, and go to Component Manager. Upload the component Customer365.zip which is located in: | |||
''...CRM/CRM_Name/CustomPages/WebsiteName/Setup/Customer365.zip | |||
'' | |||
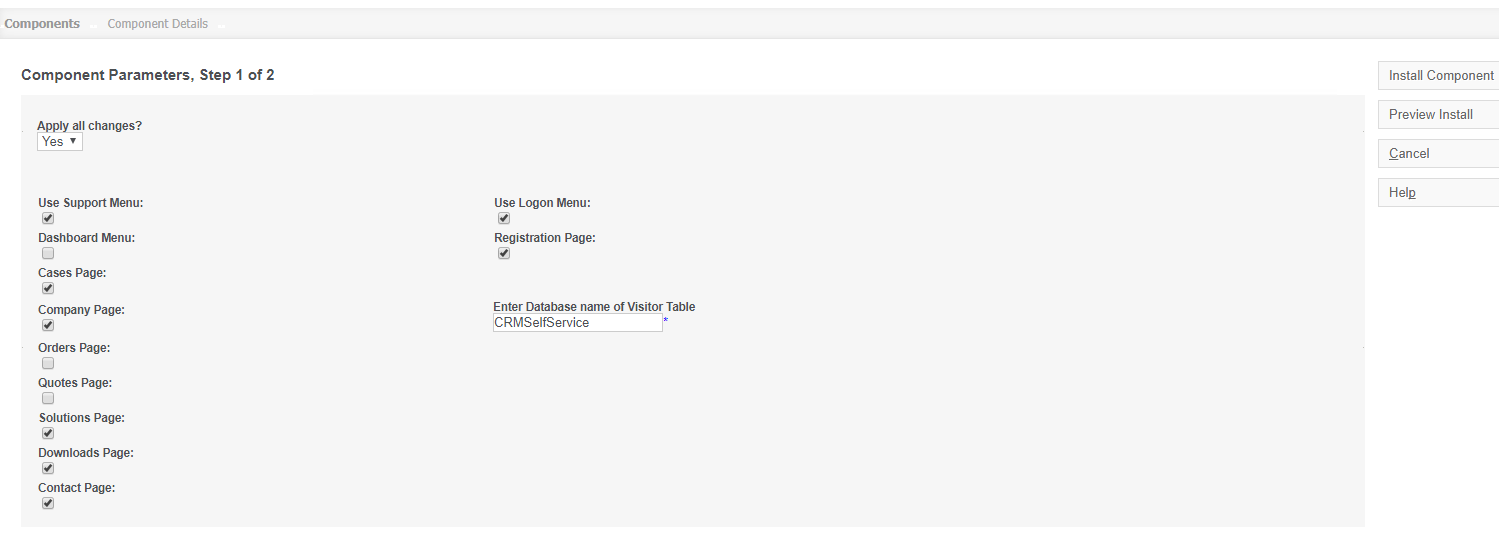
Install the component, and select which Menus should appear in Portal. Click "Preview Install" to check for any errors and if no errors occur, click "Install Component". | |||
[[File:Comp_Install.png]] | |||
The final step is to edit the Web.Config. Open Web.config located in: | |||
''...CRM/CRM_Name/CustomPages/WebsiteName/Web.Config | |||
'' | |||
and edit the following keys to set up the WebSite: | |||
<add key="PortalPath" value="http://crm.yourserver.com/CRM/custompages/WebsiteName/component/"/> | |||
<add key="CRMPath" value="http://crm.yourserver.com/CRM/"/> | |||
---- | |||
Add in "required" image | |||
Example path is | |||
http://servername/customer365/CRM/Themes/img/ergonomic/Bullets/Required.gif | |||
---- | |||
Security (1): Encrypt Password in cookie (Sept 2018 release) | |||
2 new options in web.config | |||
EnhancedSecurityPassword = encodes the password in the client cookie | |||
EnhancedSecurityPasswordPhrase = encodes based on this string - change this for more security - make sure you record this, if lost we cannot reset | |||
Settings Example | |||
<add key="EnhancedSecurityPassword" value="Y"/> | |||
<add key="EnhancedSecurityPasswordPhrase" value="default"/> | |||
---- | |||
Security (2): Encrypt Password option | |||
-This must be set before any users are registered. It cannot be enabled retroactively. The password is hidden from the CRM user also in this scenario. | |||
The setting is in web.config | |||
Default | |||
<add key = "EncryptPassword" value = "N"/> | |||
To enable | |||
<add key = "EncryptPassword" value = "Y"/> | |||
You then add a trigger on the self-service Visitor table: This is used make the email the username. | |||
Trigger on visitor table | |||
create trigger [dbo].[UpdateLogonId] | |||
on [dbo].[Visitor] | |||
after insert, update | |||
as | |||
begin | |||
set nocount on; | |||
declare @visiId int | |||
DECLARE @Email VARCHAR(50) | |||
select @visiId = INSERTED.Visi_VisitorId | |||
from inserted | |||
select @Email = INSERTED.Visi_EmailAddress | |||
from inserted | |||
update Visitor | |||
SET Visi_LogonId = @Email | |||
WHERE Visi_VisitorId = @visiId | |||
END | |||
---- | |||
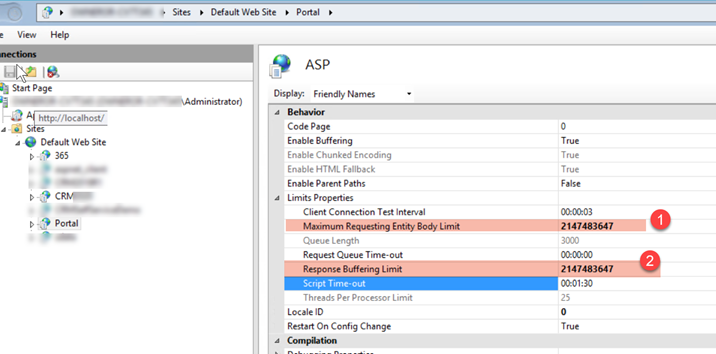
Configure these ASP settings | |||
[[File:asp_limitsconfig.png]] | |||
otherwise you may see "Response buffer limit exceeded" when using cases with images | |||
---- | |||
Create a database named "Hangfire". | |||
Configure the hangfire connection string in the web.config file. | |||
We use hangfire to send emails in parts of the system in an async manner. | |||
For details see | |||
https://docs.hangfire.io/en/latest/configuration/using-sql-server.html | |||
Latest revision as of 08:38, 17 September 2024
Installation Guide for Customer365:
Download the file Customer365ForSageCRM_RC1.exe. Run the installer on the server. The installer should add the website to IIS automatically.
After installation is complete, proceed to Sage CRM, and go to Component Manager. Upload the component Customer365.zip which is located in:
...CRM/CRM_Name/CustomPages/WebsiteName/Setup/Customer365.zip
Install the component, and select which Menus should appear in Portal. Click "Preview Install" to check for any errors and if no errors occur, click "Install Component".
The final step is to edit the Web.Config. Open Web.config located in:
...CRM/CRM_Name/CustomPages/WebsiteName/Web.Config and edit the following keys to set up the WebSite:
   <add key="PortalPath" value="http://crm.yourserver.com/CRM/custompages/WebsiteName/component/"/>
   <add key="CRMPath" value="http://crm.yourserver.com/CRM/"/>
Add in "required" image Example path is
http://servername/customer365/CRM/Themes/img/ergonomic/Bullets/Required.gif
Security (1): Encrypt Password in cookie (Sept 2018 release)
2 new options in web.config
EnhancedSecurityPassword = encodes the password in the client cookie
EnhancedSecurityPasswordPhrase = encodes based on this string - change this for more security - make sure you record this, if lost we cannot reset
Settings Example
   <add key="EnhancedSecurityPassword" value="Y"/>
   <add key="EnhancedSecurityPasswordPhrase" value="default"/>
Security (2): Encrypt Password option
-This must be set before any users are registered. It cannot be enabled retroactively. The password is hidden from the CRM user also in this scenario.
The setting is in web.config Default
<add key = "EncryptPassword" value = "N"/>
To enable
<add key = "EncryptPassword" value = "Y"/>
You then add a trigger on the self-service Visitor table: This is used make the email the username.
Trigger on visitor table
create trigger [dbo].[UpdateLogonId] on [dbo].[Visitor] after insert, update as begin
      set nocount on;
      declare @visiId int
      DECLARE @Email VARCHAR(50)
      select @visiId = INSERTED.Visi_VisitorId
      from inserted
      select @Email = INSERTED.Visi_EmailAddress
      from inserted
      update Visitor
      SET Visi_LogonId = @Email
      WHERE Visi_VisitorId = @visiId
END
Configure these ASP settings
otherwise you may see "Response buffer limit exceeded" when using cases with images
Create a database named "Hangfire".
Configure the hangfire connection string in the web.config file.
We use hangfire to send emails in parts of the system in an async manner.
For details see
https://docs.hangfire.io/en/latest/configuration/using-sql-server.html

